CSS3 Flexboxについて【めもめも】

*旧ブログ(あんど+BLOG)からの転載です。
どうも!すんです。
今回「時々WordPress」カテゴリでの更新となりましたが、WordPressとは全く関係ない(…とは言い切れませんがさすがに)
CSS3の「Flexbox」について!私のメモとして記していきたいと思います。
Flexboxについて
今回主にFlexboxで出来る事について、4つピックアップしてみました。
1.Flexboxを指定したコンテナ中のコンテンツの配置方向、順序を決めることができます
まず初めに
今回は例として、
【HTML】
<div id="container">
  <div>1</div>
  <div>2</div>
  <div>3</div>
</div>
【CSS】
#container {
     width:500px;
}

#container div:nth-of-type(1) {
     background: #eef;
     border: 1px dotted #333;
     height: 50px;
     text-align:center;
     line-height: 50px;
     padding: 5px;
}

#container div:nth-of-type(2) {
     background: #CCC;
     border: 1px dotted #333;
     height: 50px;
     text-align:center;
     line-height: 50px;
     padding: 5px;
}

#container div:nth-of-type(3) {
     background: #999;
     border: 1px dotted #333;
     height: 50px;
     text-align:center;
     line-height: 50px;
     padding: 5px;
}
という形でFlexboxを試してみます。
Flexboxを使用する為に、まず初めにFlexboxコンテナを用意します。
コンテナにしたい要素に
display : flex;
または
display : inline-flex;
を追加します。
これでFlexboxコンテナの完成です。
コンテンツの配置方向、順序を決める(flex-direction)
■ 「flex-direction: row」の場合
下記のようにCSSを追加してみます。
#container {
     display: flex;
     flex-direction: row;
}
↓「row」は初期値です。コンテンツは左から右に表示されます。

■ 「flex-direction: row-reverse」の場合
#container {
     display: flex;
     flex-direction: row-reverse;
}
↓「row-reverse」の場合、コンテンツが右から左に表示されます。

■ 「flex-direction: column」の場合
#container {
     display: flex;
     flex-direction: column;
}
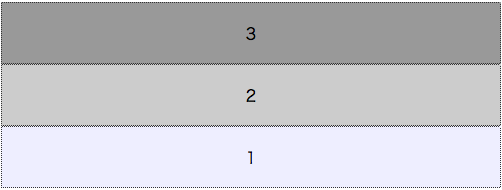
↓「column」の場合コンテンツは上から下に表示されます。

■ 「flex-direction: column-reverse」の場合
display: flex;
flex-direction: column;
↓「column-reverse」の場合、「column」とは逆にコンテンツは下から上に表示されます。

コンテンツの伸縮ができる(flex-grow)
■ 「flex-grow」の使い方
下記のようにCSSを追加してみます。
#container div:nth-of-type(1) {
     flex-grow: 1;
}

#container div:nth-of-type(2) {
     flex-grow: 2;
}

#container div:nth-of-type(3) {
     flex-grow: 1;
}

1番目と3番目のdivに「flex-grow: 1」、2番目のdivにのみ「flex-grow: 2」と設定した場合、2つめのdivは他の2倍の大きさになります。
マイナス(負)の数字は使用できません。
コンテンツの整列ができる(justify-contentとalign-items)
整列の設定をする前に、
コンテナ内のコンテンツの幅と高さを決めておきます。
【CSS】
#container div:nth-of-type(1) {
     width: 100px;
     height: 30px;
}

#container div:nth-of-type(2) {
     width: 100px;
     height: 50px;
}

#container div:nth-of-type(3) {
     width: 100px;
     height: 40px;
}
各コンテンツの幅を100pxとしました。
■ 「justify-content」の使い方【水平方向の整列】
「justify-content: center」の場合
#container {
      justify-content: center;
}

↑このように水平方向に中央揃えになります。
「justify-content: space-between」の場合
#container {
      justify-content: space-between;
}

↑このように均等にコンテンツ間隔がひらきます。
「justify-content: space-around」の場合
#container {
      justify-content: space-around;
}

↑「space-between」と同様、このように均等にコンテンツ間隔がひらきますが、
左右の端のコンテンツにも、各コンテンツ間隔の半分の間隔がつきます。
「justify-content: flex-start」の場合
配置が横(flex-direction: row または row-reverse)の場合はコンテンツは左揃え。
配置が縦(flex-direction: column または column-reverse)の場合はコンテンツは上揃えになります。
「justify-content: flex-end」の場合
配置が横(flex-direction: row または row-reverse)の場合はコンテンツは右揃え。
配置が縦(flex-direction: column または column-reverse)の場合はコンテンツは下揃えになります。
■ 「align-items」の使い方【垂直方向の整列】
「align-items: center」の場合
#container {
      align-items: center;
}

↑このように垂直方向に中央揃えになります。
応用して、「justify-content: center」も一緒に適用すると

↑コンテンツを縦横中央揃えにできます。
「align-items: baseline」の場合
#container {
      align-items: baseline;
}
コンテンツ内のベースラインを揃えます。
※ベースラインとは、文字を下揃えで配置するために使う仮想の基準線のことです。
「align-items: flex-start」の場合
配置が横(flex-direction: row または row-reverse)の場合はコンテンツは上揃えに、
配置が縦(flex-direction: column または column-reverse)の場合はコンテンツは左揃えになります。
「align-items: flex-end」の場合
配置が横(flex-direction: row または row-reverse)の場合はコンテンツは下揃えに、
配置が縦(flex-direction: column または column-reverse)の場合はコンテンツは右揃えになります。
折り返しの設定(flex-wrap)
折り返しの設定をする前に、
コンテナ内のコンテンツの幅を決めておきます。
【CSS】
#container div:nth-of-type(1) {
     width:200px;
}

#container div:nth-of-type(2) {
     width:200px;
}

#container div:nth-of-type(3) {
     width:200px;
}
各コンテンツの幅を200pxとしました。
■ 「flex-wrap」の使い方「flex-wrap: wrap」の場合
下記のようにCSSを追加してみます。
#container {
      flex-wrap: wrap;
}
コンテナの幅が500pxなのに対し、各コンテンツの幅が200pxになっているので
本来であればコンテンツがはみ出してしまいますが、

↑親要素であるコンテナの長さを子要素が超えてしまった場合、このように折り返してくれます。
■ 「flex-wrap」の使い方「flex-wrap: wrap-reverse」の場合
下記のようにCSSを追加してみます。
#container {
      flex-wrap: wrap-reverse;
}

↑「flex-wrap: wrap」の時と同様に、このように折り返してくれますが
「flex-wrap: wrap-reverse」の場合は折り返し地点が逆になります。
「flex-wrap」の初期値は「nowrap」です。
最後に
Flexbox、ここには書ききれませんでしたがまだまだ「便利だ…」「すごい!!!」といった部分が沢山あります。
それはまた次の機会に紹介していければ…と思っております。
個人的には、簡単に縦横中央揃えが出来る「justify-content: center」「align-items: center」の組み合わせに震えました。
ありがたやありがたや。
Flexboxの動きを確認しながら記事を書きましたが、
「ここ違うぞ!」「そんな動きしないよ〜」「誤字!誤字!」などなどありましたら是非つっこんでやってください。
レスポンシブサイトを作る際にも大活躍してくれるのではないかと、実際にFlexbox触ってみながら思いました。
…実は今、レスポンシブサイトを製作中なのです偶然にも。
Flexbox、使い方を覚える為にも早速積極的に取り入れていきたいと思います!!!
投稿者プロフィール
- 今年の目標:ひ弱キャラ脱却
最新の投稿
 jQuery2017.05.19ドロワーメニュー実装に使える!jQueryプラグインDrawerについて
 css2017.04.21CSSのpositionプロパティについてちょっとまとめてみた
 css2016.10.17CSSだけでできちゃう!ラベルデザイン「リボン編」
 jQuery2016.09.20レスポンシブサイト構築時に便利!「insertBefore、insertAfter」について


